Autumn desserts are special somehow. Pears in season are one of the best parts of my culinary life. Try Pear Pie this year if you haven't already, or for a lighter touch try out these poached beauties-lightly scented with ginger and lemon-for a warm finish to a fall meal.
Poached Pears
3 nearly ripe pears - Bartlett end up softer, Anjou firmer
1 cup sugar
2 slices lemon
2-3 small knobs of ginger root
4 cups warm water
Slice pears in half lengthwise. Core with a spoon and scoop seeds out. Leave stem intact if desired. Heat sugar, lemon, ginger and water in a large pan until sugar is dissolved. Peel pear halves and place in heated water. Cover and bring to a light simmer. Reduce heat to maintain this level of simmer. Poach for 6 minutes then with a slotted spoon remove pears to a covered dish to keep warm. Remove and discard 2 cups of the poaching liquid. Bring the remaining liquid to a boil and cook uncovered for about 10 minutes or until volume is halved. Discard the lemon and ginger. Serve by placing a pear half in a bowl, topping with Cardamom Creme (see below) about 2 tablespoons of the reduced syrup and pistachios.
Hints: I prefer the softer Bartlett pear but the Anjou is nice, too. If the Bartlett is too ripe, it will not hold it's shape when poached and become mushy. Boiling the pears will also cause them to break down too much, so be sure and just simmer lightly. The reduced liquid will be quite hot so be careful handling it.
Cardamom Yogurt Creme
2/3 cup Greek yogurt
1 1/2 (plus more to taste) tablespoons brown sugar
1/8 (plus more to taste) teaspoon ground cardamom
Stir together and taste. If desired, add more cardamom or brown sugar to taste. Serve with poached pears or apples.
This creme is also great as a dip for fruit platters or as fruit salad dressing.
in the kitchen
Showing posts with label sauces. Show all posts
Wednesday, October 12, 2016
Wednesday, October 2, 2013
Chilli Sauce and Sloppy Joes
Here's a shout out to the Downs'! This is a recipe of my Mom's that
uses Nana Hoffman's (Aunt Trudie's mom) Chili Sauce. This is the best
chili sauce I have ever had! Mom would make a batch or two every year in
the fall, preserve it in pints and use it to top hamburger patties, for
wonderful barbeque beef or in this fabulous sloppy Joe like sandwich.
Sloppy Joes (Nola's version)
1 lb lean ground beef
1/3 cup chopped onion
salt and pepper to taste
2 tablespoons prepared mustard
1/4 cup ketchup
1 1/2 cup chili sauce (see recipe below)
1 tablespoon brown sugar
Heat a large skillet over medium high heat. When pan is hot, place hamburger and onions in skillet and brown, breaking meat into small chunks with a wooden spoon. When meat is browned, add salt and pepper to taste and stir thoroughly. Add remaining ingredients and stir till combined. When heated through, remove from heat and serve on buns.
Chili Sauce (Nana Hoffman)
16 large tomatoes
6 medium onions
6 medium apples (equal amounts of onion and apple)
2 tablespoons salt
2 cups sugar
2 cups white vinegar
1 teaspoon cloves
1 teaspoon cinnamon
1/2 teaspoon cayenne pepper
Grind tomatoes, apples and onions. Combine in a large stock pot. Cook over medium heat for 30 minutes, stirring often. Add remaining ingredients and simmer on low about 3 hours or until apples glaze. Makes about 4 quarts. (Process quarts about 30 minutes in a water bath.)
Hints: My mom would make a double batch of Sloppy Joe for our family of six. Of course my older brothers could plow through several sandwiches at a sitting when they were teenagers. If you don't have lean ground beef, be sure to spoon the fat off after browning. I am going to try this recipe with some of the elk meat my brother gave to me--I think it will be great. Mom used dehydrated onions at least one time when she made the chili sauce and it worked fine. She would chop the tomatoes and onions roughly, shred the apples with a fine blade rather than grinding. Pints process faster than quarts, I remember her processing pints for 20 minutes.
I have fond memories of my mom and Aunt Trudie making chili sauce together, using a very, very large pot. It must have been the result of a tomato windfall in Bennie's garden. I also remember many good times with the Downs family. Once Kelly got Nana Hoffman to freak us all out by twisting her dentures backwards in her mouth with her tongue. We squealed and she laughed and continued knitting. What great times we had! I thank you; Bennie and Nola, Craig, Brent and Kirk thank you, too. Hang in there Ralph! Hang in there Trudie!
Sloppy Joes (Nola's version)
1 lb lean ground beef
1/3 cup chopped onion
salt and pepper to taste
2 tablespoons prepared mustard
1/4 cup ketchup
1 1/2 cup chili sauce (see recipe below)
1 tablespoon brown sugar
Heat a large skillet over medium high heat. When pan is hot, place hamburger and onions in skillet and brown, breaking meat into small chunks with a wooden spoon. When meat is browned, add salt and pepper to taste and stir thoroughly. Add remaining ingredients and stir till combined. When heated through, remove from heat and serve on buns.
Chili Sauce (Nana Hoffman)
16 large tomatoes
6 medium onions
6 medium apples (equal amounts of onion and apple)
2 tablespoons salt
2 cups sugar
2 cups white vinegar
1 teaspoon cloves
1 teaspoon cinnamon
1/2 teaspoon cayenne pepper
Grind tomatoes, apples and onions. Combine in a large stock pot. Cook over medium heat for 30 minutes, stirring often. Add remaining ingredients and simmer on low about 3 hours or until apples glaze. Makes about 4 quarts. (Process quarts about 30 minutes in a water bath.)
Hints: My mom would make a double batch of Sloppy Joe for our family of six. Of course my older brothers could plow through several sandwiches at a sitting when they were teenagers. If you don't have lean ground beef, be sure to spoon the fat off after browning. I am going to try this recipe with some of the elk meat my brother gave to me--I think it will be great. Mom used dehydrated onions at least one time when she made the chili sauce and it worked fine. She would chop the tomatoes and onions roughly, shred the apples with a fine blade rather than grinding. Pints process faster than quarts, I remember her processing pints for 20 minutes.
I have fond memories of my mom and Aunt Trudie making chili sauce together, using a very, very large pot. It must have been the result of a tomato windfall in Bennie's garden. I also remember many good times with the Downs family. Once Kelly got Nana Hoffman to freak us all out by twisting her dentures backwards in her mouth with her tongue. We squealed and she laughed and continued knitting. What great times we had! I thank you; Bennie and Nola, Craig, Brent and Kirk thank you, too. Hang in there Ralph! Hang in there Trudie!
Tuesday, May 28, 2013
Black Mole on Grilled Chicken Tacos
Sauces are what set meals apart. A simple sauce can make a huge difference in the level of enjoyment derived from eating. Although not "simple" this mole is pretty easy to put together, you may need to shop for some of the ingredients ahead of time but technically, it is quite easy -- soak, blend, cook. Some moles can require three dozen or more ingredients. Not this one. But as always, treat it as a beginning point to your own creativity. Let me know how you tweak it to make it your own.
Black Mole
3 ounces dried chilies, at least 1 ounce needs to be black chilies
4 cup hot water
1 large or 2 small garlic cloves
1/2 teaspoon salt
2 tablespoons canola oil
1/4 cup dried cherries
2 tablespoons pepitas (pumpkin seeds)
1/2 teaspoon coriander
1/2 teaspoon hickory smoked salt (or 1/2 teaspoon salt and 1/2 teaspoon liquid smoke)
2/3 cup very dark chocolate chunks or chips (about 68% cacoa)
In a glass bowl, cover chilies with hot water and soak for 20 minutes. Remove one pod at a time and split lengthwise, removing and discarding stem and seeds. Place chili flesh in a blender container. repeat with remaining chilies. Add garlic clove, oil, salt, cherries and pepitas. Strain 1/2 to 3/4 cup of the soaking liquid and add to blender. Blend on high until very smooth, about 2 minutes. Pour into a small sauce pan and place on medium high heat. Stir in coriander and smoked salt. Add chocolate and reduce heat to medium. Stir constantly until chocolate is melted. Add more of the strained soaking liquid if you want to thin it out. Serve hot in and over chicken tacos.
Grilled Chicken for Tacos
1 1/2 to 2 pounds boneless skinless chicken breasts
3/4 cup fresh lime juice
1 tablespoon lime zest
1/3 cup olive oil
1 teaspoon hickory smoked salt (or plain salt plus 1/2 teaspoon liquid smoke)
1/2 teaspoon pepper
1/4 cup chopped fresh cilantro
1/2 teaspoon cumin
1/2 teaspoon coriander
Pat chicken dry with paper toweling. In a large glass bowl, mix remaining ingredients well. Place chicken in the marinade and turn to coat completely. Allow to marinade for at least 1/2 hour. Heat grill to medium high heat. Place chicken on grill and close lid. Reduce heat to medium and cook for 4 to 6 minutes. Turn chicken and cook another 4 to 6 minutes or until cooked all the way through but still juicy. Remove from grill and allow to rest for several minutes. Boil marinade in a small sauce pan until reduced by half. Slice chicken into thin strips across the grain, toss with cooked marinade and serve hot.
Hints: I grilled red bell peppers and onion slices rubbed with a bit of olive oil at the same time I grilled the chicken, then sliced them up and served them in the tacos. We also had some guacamole, cheese, lettuce and black beans. This was good on both flour and corn tortillas but could be served in a bowl as a stew. Some people ate it on the lettuce as a salad without any tortillas. All very good options. When making the mole, be sure to blend the chilies thoroughly so that the skins are well incorporated. You can use plain water instead of the soaking water for a less spicy taste. Use boneless skinless chicken thighs instead of the breasts if you wish. This mole is also fabulous with tamales.
The complexity of flavor in the mole is wonderful. The chicken and beans take it very well. I love Mexican food when it is made with fresh, wholesome, healthy ingredients. But I have to admit that I also love it when it is not so healthy. I love the spicy hotness, the mellow corn, the deep, rich flavor profiles that abound in great Mexican cuisine. All regions, all the time. What is your favorite Mexican dish?
Black Mole
3 ounces dried chilies, at least 1 ounce needs to be black chilies
4 cup hot water
1 large or 2 small garlic cloves
1/2 teaspoon salt
2 tablespoons canola oil
1/4 cup dried cherries
2 tablespoons pepitas (pumpkin seeds)
1/2 teaspoon coriander
1/2 teaspoon hickory smoked salt (or 1/2 teaspoon salt and 1/2 teaspoon liquid smoke)
2/3 cup very dark chocolate chunks or chips (about 68% cacoa)
In a glass bowl, cover chilies with hot water and soak for 20 minutes. Remove one pod at a time and split lengthwise, removing and discarding stem and seeds. Place chili flesh in a blender container. repeat with remaining chilies. Add garlic clove, oil, salt, cherries and pepitas. Strain 1/2 to 3/4 cup of the soaking liquid and add to blender. Blend on high until very smooth, about 2 minutes. Pour into a small sauce pan and place on medium high heat. Stir in coriander and smoked salt. Add chocolate and reduce heat to medium. Stir constantly until chocolate is melted. Add more of the strained soaking liquid if you want to thin it out. Serve hot in and over chicken tacos.
1 1/2 to 2 pounds boneless skinless chicken breasts
3/4 cup fresh lime juice
1 tablespoon lime zest
1/3 cup olive oil
1 teaspoon hickory smoked salt (or plain salt plus 1/2 teaspoon liquid smoke)
1/2 teaspoon pepper
1/4 cup chopped fresh cilantro
1/2 teaspoon cumin
1/2 teaspoon coriander
Pat chicken dry with paper toweling. In a large glass bowl, mix remaining ingredients well. Place chicken in the marinade and turn to coat completely. Allow to marinade for at least 1/2 hour. Heat grill to medium high heat. Place chicken on grill and close lid. Reduce heat to medium and cook for 4 to 6 minutes. Turn chicken and cook another 4 to 6 minutes or until cooked all the way through but still juicy. Remove from grill and allow to rest for several minutes. Boil marinade in a small sauce pan until reduced by half. Slice chicken into thin strips across the grain, toss with cooked marinade and serve hot.
Hints: I grilled red bell peppers and onion slices rubbed with a bit of olive oil at the same time I grilled the chicken, then sliced them up and served them in the tacos. We also had some guacamole, cheese, lettuce and black beans. This was good on both flour and corn tortillas but could be served in a bowl as a stew. Some people ate it on the lettuce as a salad without any tortillas. All very good options. When making the mole, be sure to blend the chilies thoroughly so that the skins are well incorporated. You can use plain water instead of the soaking water for a less spicy taste. Use boneless skinless chicken thighs instead of the breasts if you wish. This mole is also fabulous with tamales.
The complexity of flavor in the mole is wonderful. The chicken and beans take it very well. I love Mexican food when it is made with fresh, wholesome, healthy ingredients. But I have to admit that I also love it when it is not so healthy. I love the spicy hotness, the mellow corn, the deep, rich flavor profiles that abound in great Mexican cuisine. All regions, all the time. What is your favorite Mexican dish?
Tuesday, April 23, 2013
Stuffed Shells with Lemon Garlic Sauce
Ricotta and Romano cheeses mingle with artichoke hearts and spinach to stuff these lovely shells. Finished with a lemony garlic browned butter sauce, they make a great center piece for any meal.
Spinach, Artichoke and Cheese Stuffed Shells
16 jumbo pasta shells
1 egg
1 cup ricotta cheese
1 cup shredded Romano cheese
3/4 cup chopped fresh spinach
2/3 cup chopped artichoke hearts
1 tablespoon chopped fresh chives
1/2 teaspoon salt
1/4 teaspoon white pepper
Bring 2 quarts of salted water to a boil. Cook shells for 5 to 6 minutes. Heat oven to 350 degrees. Drain and set aside to cool slightly. Beat egg in a mixing bowl. Add cheeses, spinach, artichoke, chives and salt and pepper. Mix thoroughly. Grease a baking dish with a bit of olive oil. Using a spoon, stuff shells with cheese mixture and place in baking dish. Cover tightly with foil and bake for 30 minutes. Serve with red sauce or lemon garlic sauce.
Lemon Garlic Browned Butter Sauce
1/4 cup extra virgin olive oil
3 tablespoons butter, divided
2 garlic cloves, smashed, peeled and minced
1 tablespoon chopped chives
1 teaspoon lemon zest
3 tablespoons lemon juice
1/2 teaspoon salt
Heat olive oil and 2 tablespoons butter in a small sauce pan, stirring until butter foams. Add garlic, chives and lemon zest, continue to cook and stir for 2 minutes or until butter has browned and garlic is golden. Remove from heat and add lemon juice, remaining butter and salt. Stir until butter is melted. Spoon over shells or toss with hot pasta.
Hints: Don't over cook the shells or they will tear when you try to stuff them. I use canned artichoke hearts, about half a 15 ounce can. You could use lasagne noodles coated with the filling and rolled up instead of the shells. Or spinach crepes. The sauce could be used for pork or chicken cutlets.
These shells make a great brunch dish or a lovely light dinner. The garlic and lemon flavors play off the cheeses beautifully. Your family and guests will really appreciate this dish.
Spinach, Artichoke and Cheese Stuffed Shells
16 jumbo pasta shells
1 egg
1 cup ricotta cheese
1 cup shredded Romano cheese
3/4 cup chopped fresh spinach
2/3 cup chopped artichoke hearts
1 tablespoon chopped fresh chives
1/2 teaspoon salt
1/4 teaspoon white pepper
Bring 2 quarts of salted water to a boil. Cook shells for 5 to 6 minutes. Heat oven to 350 degrees. Drain and set aside to cool slightly. Beat egg in a mixing bowl. Add cheeses, spinach, artichoke, chives and salt and pepper. Mix thoroughly. Grease a baking dish with a bit of olive oil. Using a spoon, stuff shells with cheese mixture and place in baking dish. Cover tightly with foil and bake for 30 minutes. Serve with red sauce or lemon garlic sauce.
Lemon Garlic Browned Butter Sauce
1/4 cup extra virgin olive oil
3 tablespoons butter, divided
2 garlic cloves, smashed, peeled and minced
1 tablespoon chopped chives
1 teaspoon lemon zest
3 tablespoons lemon juice
1/2 teaspoon salt
Heat olive oil and 2 tablespoons butter in a small sauce pan, stirring until butter foams. Add garlic, chives and lemon zest, continue to cook and stir for 2 minutes or until butter has browned and garlic is golden. Remove from heat and add lemon juice, remaining butter and salt. Stir until butter is melted. Spoon over shells or toss with hot pasta.
Hints: Don't over cook the shells or they will tear when you try to stuff them. I use canned artichoke hearts, about half a 15 ounce can. You could use lasagne noodles coated with the filling and rolled up instead of the shells. Or spinach crepes. The sauce could be used for pork or chicken cutlets.
These shells make a great brunch dish or a lovely light dinner. The garlic and lemon flavors play off the cheeses beautifully. Your family and guests will really appreciate this dish.
Wednesday, February 27, 2013
Stuffed Peppers w/ Gorgonzola and Pistachios
How to make ground beef taste gourmet? Blue cheese, pistachios, garlic and red bell peppers place this dish firmly in the gourmand's view screen.
Stuffed Peppers with Gorgonzola and Pistachios
3 large red bell peppers
1 1/2 quarts boiling water
1 pound lean ground beef
1 cup cooked quinoa
1 egg
2 cloves garlic, minced
1/4 cup finely diced sweet onion
1/3 cup Gorgonzola or blue cheese crumbles
1/4 cup chopped pistachios, roasted and salted
1/2 teaspoon kosher salt
1/4 teaspoon freshly ground black pepper
1 to 2 teaspoons minced fresh rosemary
1 recipe Beef Gravy (recipe follows)
Optional: additional Gorgonzola, pistachios and rosemary for garnish
Heat oven to 350 degrees. Half peppers lengthwise, remove seeds and ribs. Place in boiling water for 2 minutes. Remove from pot with tongs and set cut side down on a board to drain. Discard water. In a mixing bowl, combine beef, quinoa, egg, garlic, onion, blue cheese, pistachios, salt, pepper and rosemary. Mix together thoroughly. Place peppers in a buttered baking dish, cut side up. Spoon meat mixture into peppers without packing down. Bake uncovered for 35 to 40 minutes or until beef is cooked through. Serve with beef gravy and garnish with cheese, pistachios and rosemary if desired.
Beef Gravy
1 tablespoon butter
1 1/2 tablespoons cornstarch
1 1/2 cups water
2 teaspoons beef stock paste
1 tablespoon soy sauce
1 teaspoon balsamic vinegar
1/2 teaspoon Dijon mustard
1/2 teaspoon sugar
1/4 teaspoon black pepper
Heat butter in a sauce pan. Cook until butter begins to brown. Stir in cornstarch. Add water and whisk until smooth. Whisk in stock paste, soy sauce, vinegar, mustard, sugar and pepper. Cook and stir until gravy is thick and hot. Serve over meatloaf.
Hints: Par boiling the peppers is the only way to get them cooked enough without overcooking the meatloaf stuffing. Mix the meatloaf mixture well but lightly. The quinoa works nicely in this recipe and makes it gluten free. You can substitute bread crumbs for the quinoa but will only need about 3/4 cup. I have also used dry oatmeal. If you don't love rosemary, try thyme or oregano. This recipe makes good meatloaf/ meat balls w/o the peppers, but we all need the veggies, right? The gravy can be used for mashed potatoes or noodles. I prefer the beef stock paste to beef bullion crystals or canned broth, but you could substitute either in this recipe.
One of my favorite steak sauces is a simple blue cheese cream sauce. This recipe reminds me of that flavor combo but is quite a bit less expensive and has quite a few less calories. The cheese keeps the beef from drying out and the gravy is a perfect finish. Remember the "Beef--It's whats for dinner"campaign? Some days red meat is what you need, what you crave and ground beef in the freezer can yield satisfaction. I believe this recipe would translate particularly well with elk or buffalo.
Stuffed Peppers with Gorgonzola and Pistachios
3 large red bell peppers
1 1/2 quarts boiling water
1 pound lean ground beef
1 cup cooked quinoa
1 egg
2 cloves garlic, minced
1/4 cup finely diced sweet onion
1/3 cup Gorgonzola or blue cheese crumbles
1/4 cup chopped pistachios, roasted and salted
1/2 teaspoon kosher salt
1/4 teaspoon freshly ground black pepper
1 to 2 teaspoons minced fresh rosemary
1 recipe Beef Gravy (recipe follows)
Optional: additional Gorgonzola, pistachios and rosemary for garnish
Heat oven to 350 degrees. Half peppers lengthwise, remove seeds and ribs. Place in boiling water for 2 minutes. Remove from pot with tongs and set cut side down on a board to drain. Discard water. In a mixing bowl, combine beef, quinoa, egg, garlic, onion, blue cheese, pistachios, salt, pepper and rosemary. Mix together thoroughly. Place peppers in a buttered baking dish, cut side up. Spoon meat mixture into peppers without packing down. Bake uncovered for 35 to 40 minutes or until beef is cooked through. Serve with beef gravy and garnish with cheese, pistachios and rosemary if desired.
Beef Gravy
1 tablespoon butter
1 1/2 tablespoons cornstarch
1 1/2 cups water
2 teaspoons beef stock paste
1 tablespoon soy sauce
1 teaspoon balsamic vinegar
1/2 teaspoon Dijon mustard
1/2 teaspoon sugar
1/4 teaspoon black pepper
Heat butter in a sauce pan. Cook until butter begins to brown. Stir in cornstarch. Add water and whisk until smooth. Whisk in stock paste, soy sauce, vinegar, mustard, sugar and pepper. Cook and stir until gravy is thick and hot. Serve over meatloaf.
Hints: Par boiling the peppers is the only way to get them cooked enough without overcooking the meatloaf stuffing. Mix the meatloaf mixture well but lightly. The quinoa works nicely in this recipe and makes it gluten free. You can substitute bread crumbs for the quinoa but will only need about 3/4 cup. I have also used dry oatmeal. If you don't love rosemary, try thyme or oregano. This recipe makes good meatloaf/ meat balls w/o the peppers, but we all need the veggies, right? The gravy can be used for mashed potatoes or noodles. I prefer the beef stock paste to beef bullion crystals or canned broth, but you could substitute either in this recipe.
One of my favorite steak sauces is a simple blue cheese cream sauce. This recipe reminds me of that flavor combo but is quite a bit less expensive and has quite a few less calories. The cheese keeps the beef from drying out and the gravy is a perfect finish. Remember the "Beef--It's whats for dinner"campaign? Some days red meat is what you need, what you crave and ground beef in the freezer can yield satisfaction. I believe this recipe would translate particularly well with elk or buffalo.
Sunday, February 17, 2013
Lemon Garlic Dip
Adding more veggies to your diet is great...but the downside may be what you eat with them. I had an opportunity to indulge in a veggie tray last week but the dip was a ranch type that was loaded with salt, preservatives and unpronounceable chemicals. Coming up with a healthier dip that used real ingredients presented itself as a challenge. Here is the result. (Works great as a dip for Rice Crackers, too.)
Lemon Garlic Dip
1/2 cup Greek yogurt
1/3 cup sour cream
2 tablespoons mayonnaise
2 teaspoons Dijon mustard
1 garlic clove
Zest from 1/2 lemon
3/4 teaspoon kosher salt
1/8 teaspoon white pepper
Optional: up to 1 tablespoon minced fresh herbs such as parsley, chives, rosemary, sage, thyme etc.
Optional garnish: 1 ounce finely grated Colby Jack cheese or chopped pistachios
Place yogurt, sour cream, mayo, mustard in a bowl. Using a micro planer, grate peeled garlic clove over the top. Zest lemon with planer as well. Add salt, pepper and herbs if using, then mix thoroughly. Top with garnish if desired. Serve with prepared veggies.
Hints: I didn't have any fresh herbs for this photo session but they would be great addition if you have them. Some herbs will be stronger than others so watch how much you add. You can serve these in individual portions or present as a traditional tray. Taste to see if you need more salt. Use Miracle Whip instead of mayo if desired, the result will have a hint of sweetness. Refrigerate left overs soon after serving.
Probably healthier than packaged ranch dip mix, definitely much fresher tasting. Raw veggies are delicious on their own but a bit of dip adds a complexity of flavor that our palates appreciate. Try this dip with crackers, as a sandwich spread or as a base for a salad dressing.
Lemon Garlic Dip
1/2 cup Greek yogurt
1/3 cup sour cream
2 tablespoons mayonnaise
2 teaspoons Dijon mustard
1 garlic clove
Zest from 1/2 lemon
3/4 teaspoon kosher salt
1/8 teaspoon white pepper
Optional: up to 1 tablespoon minced fresh herbs such as parsley, chives, rosemary, sage, thyme etc.
Optional garnish: 1 ounce finely grated Colby Jack cheese or chopped pistachios
Place yogurt, sour cream, mayo, mustard in a bowl. Using a micro planer, grate peeled garlic clove over the top. Zest lemon with planer as well. Add salt, pepper and herbs if using, then mix thoroughly. Top with garnish if desired. Serve with prepared veggies.
Hints: I didn't have any fresh herbs for this photo session but they would be great addition if you have them. Some herbs will be stronger than others so watch how much you add. You can serve these in individual portions or present as a traditional tray. Taste to see if you need more salt. Use Miracle Whip instead of mayo if desired, the result will have a hint of sweetness. Refrigerate left overs soon after serving.
| With Colby Jack cheese garnish |
| With chopped pistachio garnish |
Monday, February 4, 2013
Knodels with Ham and Bacon
This dish may seem a bit complicated but it is not really. A few steps, none of them difficult. And the end product is so worth it! Another Austrian specialty that I learned of too late in life. Amy buys these in several varieties but the speck kind are the only ones I can imitate here in Utah using ham and bacon. The paprika sauce is similar to what I have had with knodels but another sauce would be fine if you don't like paprika. Traditional accompaniment is Sweet and Sour Purple Cabbage.
Knodels with Ham and Bacon
Dough:
2 cups cooked potato, riced (baking is preferred to boiling)
1 cup flour
2 tablespoons dry quick cooking grits (see Hints for substitutions)
1 1/2 teaspoons salt
1/4 teaspoon white pepper
2 eggs
Place potato in a mixing bowl. Add flour, grits, salt and pepper then mix thoroughly but lightly. Mix in the eggs. The dough should be light and a bit sticky, add more flour if it is too sticky. You will need to be able to handle it with floured hands. Set aside to rest while make the filling.
Filling:
5 slices bacon, diced
1/2 cup sweet white onion
1/2 cup diced ham
Cook bacon and onion in a hot skillet for 3 or 4 minutes, stirring occasionally. Place ham in a food processor and pulse 10 to 12 times. When bacon is about half way to crispy, add onions and bacon to the ham in the processor bowl and pulse another 10 times. The meat mixture should be crumbly, not smooth. Discard any bacon drippings that have accumulated in the skillet up to this point. Return bacon and ham to skillet and cook for 5 more minutes or until browned.
Assembly:
With floured hands, divide dough into 16 pieces by pinching it in half and those halves in half, etc. Set dough balls on a floured board. Flatten a ball into a 3 inch disc with your fingers and hold in a cupped hand. Place 1 tablespoon of the filling in the center and press down slightly with your other thumb. Seal the filling inside by pinching the edges of the disc together. The seal needs to be complete or water will seep inside while cooking. Gently roll the knodel between your palms to round it out. Replace on the floured board and repeat to fill each dough piece.
Cooking:
Bring 2 quarts of water to a boil in a deep pan. Place 8 knodels in the water and cook for 6 to 8 minutes. They will begin to float at about 3 minutes. Remove with a slotted spoon, place in a serving dish and keep warm by covering with foil. Cook remaining 8 knodels the same way.
Paprika Sauce
1 tablespoon butter
1 teaspoon smoked paprika
1/2 teaspoon beef stock paste
3/4 cup water
1 teaspoon cornstarch
Melt butter in a small sauce pan. Whisk in paprika and beef stock paste. Cook and stir for 1 minute. Mix cornstarch with water then whisk into sauce base. Continue to cook until cornstarch has cleared and sauce has thicken slightly. Keep warm to serve.
To serve, spoon sauce over knodels. (Cutting slits in them first will allow the sauce inside.)
Hints: I use my hands to mix the dough, that way I can tell if it is too sticky. You can't take flour out so add it in a bit at a time if you need any extra. Grits are not necessary but some type of absorbent grain product helps, Cream of Wheat, bread crumbs or corn meal would work. Make sure you do not over process the ham and bacon. There should be some texture in the final product. Multi-tasking is the way to go here--start the cabbage while you are making the dough. Make the sauce while the knodels are boiling. That way everything will be ready at the same time. Left over knodels are good warmed in a microwave. I just store them with the sauce and reheat all at once.
This meal says Austria to me more than any other except perhaps schnitzel. I have found Austrian food to be amazing. The traditional regional dishes are inspiring and can be modernized to fit with a healthy lifestyle. An emphasis on fresh, seasonal food is not just a United States phenomenon. Technique is not strictly a French or Italian or Chinese component. Obviously, neither is flavor. There are many cuisines in the world that we can appreciate, be inspired by and thoroughly enjoy.
| Knodels split open to receive sauce, served with fresh kraut |
Dough:
2 cups cooked potato, riced (baking is preferred to boiling)
1 cup flour
2 tablespoons dry quick cooking grits (see Hints for substitutions)
1 1/2 teaspoons salt
1/4 teaspoon white pepper
2 eggs
Place potato in a mixing bowl. Add flour, grits, salt and pepper then mix thoroughly but lightly. Mix in the eggs. The dough should be light and a bit sticky, add more flour if it is too sticky. You will need to be able to handle it with floured hands. Set aside to rest while make the filling.
Filling:
5 slices bacon, diced
1/2 cup sweet white onion
1/2 cup diced ham
Cook bacon and onion in a hot skillet for 3 or 4 minutes, stirring occasionally. Place ham in a food processor and pulse 10 to 12 times. When bacon is about half way to crispy, add onions and bacon to the ham in the processor bowl and pulse another 10 times. The meat mixture should be crumbly, not smooth. Discard any bacon drippings that have accumulated in the skillet up to this point. Return bacon and ham to skillet and cook for 5 more minutes or until browned.
| Mincing ham in a food processor is quick |
With floured hands, divide dough into 16 pieces by pinching it in half and those halves in half, etc. Set dough balls on a floured board. Flatten a ball into a 3 inch disc with your fingers and hold in a cupped hand. Place 1 tablespoon of the filling in the center and press down slightly with your other thumb. Seal the filling inside by pinching the edges of the disc together. The seal needs to be complete or water will seep inside while cooking. Gently roll the knodel between your palms to round it out. Replace on the floured board and repeat to fill each dough piece.
Cooking:
Bring 2 quarts of water to a boil in a deep pan. Place 8 knodels in the water and cook for 6 to 8 minutes. They will begin to float at about 3 minutes. Remove with a slotted spoon, place in a serving dish and keep warm by covering with foil. Cook remaining 8 knodels the same way.
Paprika Sauce
1 tablespoon butter
1 teaspoon smoked paprika
1/2 teaspoon beef stock paste
3/4 cup water
1 teaspoon cornstarch
Melt butter in a small sauce pan. Whisk in paprika and beef stock paste. Cook and stir for 1 minute. Mix cornstarch with water then whisk into sauce base. Continue to cook until cornstarch has cleared and sauce has thicken slightly. Keep warm to serve.
To serve, spoon sauce over knodels. (Cutting slits in them first will allow the sauce inside.)
Hints: I use my hands to mix the dough, that way I can tell if it is too sticky. You can't take flour out so add it in a bit at a time if you need any extra. Grits are not necessary but some type of absorbent grain product helps, Cream of Wheat, bread crumbs or corn meal would work. Make sure you do not over process the ham and bacon. There should be some texture in the final product. Multi-tasking is the way to go here--start the cabbage while you are making the dough. Make the sauce while the knodels are boiling. That way everything will be ready at the same time. Left over knodels are good warmed in a microwave. I just store them with the sauce and reheat all at once.
This meal says Austria to me more than any other except perhaps schnitzel. I have found Austrian food to be amazing. The traditional regional dishes are inspiring and can be modernized to fit with a healthy lifestyle. An emphasis on fresh, seasonal food is not just a United States phenomenon. Technique is not strictly a French or Italian or Chinese component. Obviously, neither is flavor. There are many cuisines in the world that we can appreciate, be inspired by and thoroughly enjoy.
Sunday, February 3, 2013
Lettuce Wraps w/ Cauliflower
I've shared some lettuce wraps before, with beef. They are tasty but quite different than the lettuce wraps you get at Oriental food restaurants. Here is an Oriental inspired type I made last week that turned out to be scrumptious. Lots of good for you veggies and a hot sauce you can use for other dishes, too.
Chicken Lettuce Wraps
2 chicken breast halves, raw meat cut into 1/2 inch dice
1/2 teaspoon toasted sesame oil
2 teaspoons plus 2 tablespoons soy sauce
2 tablespoons coconut oil (or peanut oil)
1/4 cup grated carrot
1/4 cup minced onion
1 minced garlic clove
1/4 cup finely diced celery
1/2 cup finely diced red bell pepper
1 cup chopped cauliflower
1/2 cup shredded purple cabbage
2 teaspoons freshly grated ginger root
1/2 teaspoon coriander
1/8 teaspoon red pepper flakes
2 teaspoons cornstarch
Iceberg lettuce leaves, about 1/2 head
Roasted peanuts
Hot and Sour Sauce (see recipe below)
Pour the toasted sesame oil and 2 teaspoons of soy sauce over chicken. Toss to coat and set aside. Heat a wok or large non-stick skillet over high heat. Add the coconut oil to the pan. When the oil is hot, cook the chicken for 3 minutes, stirring occasionally. Once the chicken has begun to brown slightly, begin adding the veggies. Add the carrots, onions and garlic first. Cook for 2 to 3 minutes, stirring frequently. Then add the celery and bell pepper, cook and stir for another minute. Finally add the cauliflower, cabbage and ginger. Continue cooking, stirring frequently, while in a small bowl you whisk together 2 tablespoons soy sauce, coriander, red pepper flakes and cornstarch. Stir soy sauce mixture into chicken and veggie mixture. Cook and stir for 1 to 2 more minutes, check for seasoning, adding salt or soy sauce if needed. Serve with lettuce leaves, peanuts and hot sauce.
Hints: I used boneless, skinless chicken breasts and that was quick. I diced them while they were partially frozen which made it easier. While I prepared the rest of the ingredients, the meat thawed out all the way. Adding the ingredients at different times will make some of the veggies softer and some crisper, you can alter the order listed to get the veggies you want crisper added at the end. I have started keeping some ginger root in the freezer and love it! It grates so easily with my microplaner. Less fibrous end produce when grated and very fine. It doesn't get soft or mold like it sometimes can in the produce drawer of the fridge.
Hot and Sour Sauce
1/2 teaspoon toasted sesame oil
2 tablespoons soy sauce
3 tablespoons rice vinegar
1/2 teaspoon honey
1 teaspoon hot pepper flakes
1/4 teaspoon cornstarch
Mix all ingredients together in a microwave safe bowl that has a one cup capacity. Heat in microwave for 1 minute or until the cornstarch is cleared. Stir and allow to cool before serving. (This recipe can be doubled.) This sauce could be used as a dipping sauce for pot stickers or chicken skewers etc.
This is a delicious dinner served with some black rice but would also make a great appetizer or snack. Serving the hot sauce on the side allows for everyone at the table to tailor their dinner to their heat tolerance (or lack thereof). Three of us wolfed the lettuce wraps and black rice down lickety split. And we all felt pretty good about it. A healthy dinner is a nice way to end a day or begin an evening.
2 chicken breast halves, raw meat cut into 1/2 inch dice
1/2 teaspoon toasted sesame oil
2 teaspoons plus 2 tablespoons soy sauce
2 tablespoons coconut oil (or peanut oil)
1/4 cup grated carrot
1/4 cup minced onion
1 minced garlic clove
1/4 cup finely diced celery
1/2 cup finely diced red bell pepper
1 cup chopped cauliflower
1/2 cup shredded purple cabbage
2 teaspoons freshly grated ginger root
1/2 teaspoon coriander
1/8 teaspoon red pepper flakes
2 teaspoons cornstarch
Iceberg lettuce leaves, about 1/2 head
Roasted peanuts
Hot and Sour Sauce (see recipe below)
Pour the toasted sesame oil and 2 teaspoons of soy sauce over chicken. Toss to coat and set aside. Heat a wok or large non-stick skillet over high heat. Add the coconut oil to the pan. When the oil is hot, cook the chicken for 3 minutes, stirring occasionally. Once the chicken has begun to brown slightly, begin adding the veggies. Add the carrots, onions and garlic first. Cook for 2 to 3 minutes, stirring frequently. Then add the celery and bell pepper, cook and stir for another minute. Finally add the cauliflower, cabbage and ginger. Continue cooking, stirring frequently, while in a small bowl you whisk together 2 tablespoons soy sauce, coriander, red pepper flakes and cornstarch. Stir soy sauce mixture into chicken and veggie mixture. Cook and stir for 1 to 2 more minutes, check for seasoning, adding salt or soy sauce if needed. Serve with lettuce leaves, peanuts and hot sauce.
Hints: I used boneless, skinless chicken breasts and that was quick. I diced them while they were partially frozen which made it easier. While I prepared the rest of the ingredients, the meat thawed out all the way. Adding the ingredients at different times will make some of the veggies softer and some crisper, you can alter the order listed to get the veggies you want crisper added at the end. I have started keeping some ginger root in the freezer and love it! It grates so easily with my microplaner. Less fibrous end produce when grated and very fine. It doesn't get soft or mold like it sometimes can in the produce drawer of the fridge.
Hot and Sour Sauce
1/2 teaspoon toasted sesame oil
2 tablespoons soy sauce
3 tablespoons rice vinegar
1/2 teaspoon honey
1 teaspoon hot pepper flakes
1/4 teaspoon cornstarch
Mix all ingredients together in a microwave safe bowl that has a one cup capacity. Heat in microwave for 1 minute or until the cornstarch is cleared. Stir and allow to cool before serving. (This recipe can be doubled.) This sauce could be used as a dipping sauce for pot stickers or chicken skewers etc.
This is a delicious dinner served with some black rice but would also make a great appetizer or snack. Serving the hot sauce on the side allows for everyone at the table to tailor their dinner to their heat tolerance (or lack thereof). Three of us wolfed the lettuce wraps and black rice down lickety split. And we all felt pretty good about it. A healthy dinner is a nice way to end a day or begin an evening.
Sunday, January 20, 2013
Variations w/ Cilantro Pesto
When it comes to a dining experience, themes work out very well. It helps to plan a meal around a theme, something that connects the dishes to each other so that they compliment or contrast each other in a way that enhances each. Usually, I will choose a flavor profile/ progression or a single ingredient that can move through out the meal as a unifying element. The connections can be textural or visual as well. A good example is this pesto that my daughter Sophie made and brought to me. A beautiful green cilantro creation that we served as is over pork medallions and then incorporated into a vinaigrette for the salad.
Cilantro Pesto Vinaigrette
1/2 cup Cilantro Pesto (recipe follows)
1/3 cup white balsamic vinegar
1 teaspoon orange zest
3 tablespoons orange juice
1/4 teaspoon kosher salt
Whisk all ingredients together and toss with chopped romaine lettuce, avocado chunks, orange sections and diced red bell peppers.
Lime Cilantro Pesto
1/3 cup pepitas
1/3 cup extra virgin olive oil
2 limes, zest and juice
2 cloves garlic
3 cups cilantro (leaves and small stems)
1/3 cup Parmesan or Romano cheese
1/4 teaspoon salt
1/4 teaspoon black pepper
1/2 teaspoon (or to taste) hot pepper sauce
Heat a small pan over medium high heat. Add the pepitas to the pan and toast for 2 to 3 minutes, shaking or stirring often to prevent burning. Place pepitas in a food processor bowl. Add remaining ingredients and pulse several times to rough chop pesto. Then run the processor on a steady setting for 20 to 30 seconds. Serve with pasta, poultry, meat or fish dishes. Or as a condiment for sandwiches, fries, etc. Store in an air tight container in the refrigerator.
Hints: Wonderful way to celebrate cilantro! Sophie served it for lunch on pasta and then brought over what was left, which we used as a sauce for pork and in the salad dressing. There are several other ways we thought of using it but it was gone! Make sure the cilantro is washed but not too wet, a salad spinner would be useful here, but paper towels will work. Sophie used the Parmesan and it was wonderful but Romano would be great, too. Use as much hot pepper sauce as you like remembering that you can always add more but can't take any out once it is in. Add more white balsamic if you like a tangier vinaigrette or more orange juice if you like a sweeter version. To complete the theme here, one could use the lime as the star ingredient in dessert. Themes are nice, huh? Click here for another pesto recipe you may enjoy.
Thanks Sophie! Great stuff and a fine evening. I love cooking for my family and I love cooking with them even more. Nice fresh ingredients, using what is on hand, whipping up a creative meal, enjoying dinner with loved ones, sharing stories and laughing--those are some awfully good times.
Cilantro Pesto Vinaigrette
1/2 cup Cilantro Pesto (recipe follows)
1/3 cup white balsamic vinegar
1 teaspoon orange zest
3 tablespoons orange juice
1/4 teaspoon kosher salt
Whisk all ingredients together and toss with chopped romaine lettuce, avocado chunks, orange sections and diced red bell peppers.
Lime Cilantro Pesto
1/3 cup pepitas
1/3 cup extra virgin olive oil
2 limes, zest and juice
2 cloves garlic
3 cups cilantro (leaves and small stems)
1/3 cup Parmesan or Romano cheese
1/4 teaspoon salt
1/4 teaspoon black pepper
1/2 teaspoon (or to taste) hot pepper sauce
Heat a small pan over medium high heat. Add the pepitas to the pan and toast for 2 to 3 minutes, shaking or stirring often to prevent burning. Place pepitas in a food processor bowl. Add remaining ingredients and pulse several times to rough chop pesto. Then run the processor on a steady setting for 20 to 30 seconds. Serve with pasta, poultry, meat or fish dishes. Or as a condiment for sandwiches, fries, etc. Store in an air tight container in the refrigerator.
Hints: Wonderful way to celebrate cilantro! Sophie served it for lunch on pasta and then brought over what was left, which we used as a sauce for pork and in the salad dressing. There are several other ways we thought of using it but it was gone! Make sure the cilantro is washed but not too wet, a salad spinner would be useful here, but paper towels will work. Sophie used the Parmesan and it was wonderful but Romano would be great, too. Use as much hot pepper sauce as you like remembering that you can always add more but can't take any out once it is in. Add more white balsamic if you like a tangier vinaigrette or more orange juice if you like a sweeter version. To complete the theme here, one could use the lime as the star ingredient in dessert. Themes are nice, huh? Click here for another pesto recipe you may enjoy.
Thanks Sophie! Great stuff and a fine evening. I love cooking for my family and I love cooking with them even more. Nice fresh ingredients, using what is on hand, whipping up a creative meal, enjoying dinner with loved ones, sharing stories and laughing--those are some awfully good times.
Monday, January 7, 2013
Chicken or Turkey Pot Pie
An updated version of a Chicken Pot Pie seemed in order with winter in full swing. A great classic cold weather meal made with a few updated ingredients, not too many, just a few for the modern cook to wiggle her fingers a bit.
Chicken (or Turkey) Pot Pie
3/4 cup white flour
3/4 cup whole wheat flour
1 1/2 teaspoon salt, divided
5 tablespoons coconut oil
1/2 cup cold water
4 slices bacon
2 tablespoons finely diced red onion
1/4 cup shredded carrot
1/4 cup finely diced celery
1 cup sliced fingerling potatoes
1/2 teaspoon rubbed sage
1/2 teaspoon crushed dried rosemary
1/4 teaspoon pepper
1/4 cup frozen peas
1 1/2 cups diced cooked chicken or turkey
1 cup chicken or turkey gravy (see recipe below)
Mix flours and 1 teaspoon salt in a bowl. Soften oil slightly and stir into flour. Add water and combine to form a ball. Divide dough into 4 pieces. Roll each piece into a circle about 8 inches wide. Tuck the crust into 4 ramekins (4 x 2 inches), and allow excess dough to flop over the top. Push to seal the overlaps that will occur up the sides of the ramekins. Place on a baking sheet and set aside. Turn oven on to 350 degrees. Heat a non-stick skillet over medium high heat and with shears cut bacon into 1/4 inch slices over hot skillet. Stir and cook for 2 minutes. Add onions and cook another minute. Add carrots and celery and cook for 2 more minutes. Stir in potato slices and cook for 2 more minutes. Season with remaining 1/2 teaspoon salt, sage, rosemary and pepper. Cook for 1 more minute then add peas and chicken. Cook until peas are thawed, about 2 minutes, then stir in gravy. Place 1/4 of the filling mixture in to each ramekin, pull the excess crust over the filling, leaving an opening in the center. Bake for 25 to 30 minutes. Serve hot in ramekins.
Hints: Don't melt the coconut oil completely, just a quick jolt in a microwave to soften enough to blend with the flour. Mix it with the back of a spoon or with your hands. You can also cut it in like you would shortening or butter if you don't want to soften it up. If your bacon doesn't have much grease, add 1 or 2 teaspoons of butter when sauteing the veggies. Adjust the amount of the various veggies as you see fit; lower the proportion of potatoes if you want, add in parsnips or use sweet potato chunks instead of fingerling slices. It's what you have on hand cooking at it's root. Sauteing the veggies helps with the final taste and texture. The free form look indicates good rustic cooking but you certainly can make these more refined looking by using a top crust with cut outs or add ons.
Simple Turkey (or Chicken) Gravy (This recipe can be halved)
Drippings from the roasting pan plus milk to equal 3 cups
2 to 3 teaspoons chicken stock paste
1/3 cup flour mixed with an additional 1/2 cup milk
1/2 cup heavy cream
Heat drippings and milk over medium heat until simmering. Add stock paste and mix thoroughly. Whisk in the flour and milk mixture. Reduce heat and cook until thicken, stirring often. Taste to adjust seasoning and add more chicken stock paste or salt if needed. Finish with the heavy cream. Heat through and serve. (Recipe can be made without drippings by increasing stock paste and adding at least 1 tablespoon butter.)
This is always a hit for dinner at my house. It is a stick to your ribs, comfort food that feels as good as it tastes somehow. Home cooking is really about satisfaction on many levels and dishes like pot pie get you there.
Chicken (or Turkey) Pot Pie
3/4 cup white flour
3/4 cup whole wheat flour
1 1/2 teaspoon salt, divided
5 tablespoons coconut oil
1/2 cup cold water
4 slices bacon
2 tablespoons finely diced red onion
1/4 cup shredded carrot
1/4 cup finely diced celery
1 cup sliced fingerling potatoes
1/2 teaspoon rubbed sage
1/2 teaspoon crushed dried rosemary
1/4 teaspoon pepper
1/4 cup frozen peas
1 1/2 cups diced cooked chicken or turkey
1 cup chicken or turkey gravy (see recipe below)
Mix flours and 1 teaspoon salt in a bowl. Soften oil slightly and stir into flour. Add water and combine to form a ball. Divide dough into 4 pieces. Roll each piece into a circle about 8 inches wide. Tuck the crust into 4 ramekins (4 x 2 inches), and allow excess dough to flop over the top. Push to seal the overlaps that will occur up the sides of the ramekins. Place on a baking sheet and set aside. Turn oven on to 350 degrees. Heat a non-stick skillet over medium high heat and with shears cut bacon into 1/4 inch slices over hot skillet. Stir and cook for 2 minutes. Add onions and cook another minute. Add carrots and celery and cook for 2 more minutes. Stir in potato slices and cook for 2 more minutes. Season with remaining 1/2 teaspoon salt, sage, rosemary and pepper. Cook for 1 more minute then add peas and chicken. Cook until peas are thawed, about 2 minutes, then stir in gravy. Place 1/4 of the filling mixture in to each ramekin, pull the excess crust over the filling, leaving an opening in the center. Bake for 25 to 30 minutes. Serve hot in ramekins.
Hints: Don't melt the coconut oil completely, just a quick jolt in a microwave to soften enough to blend with the flour. Mix it with the back of a spoon or with your hands. You can also cut it in like you would shortening or butter if you don't want to soften it up. If your bacon doesn't have much grease, add 1 or 2 teaspoons of butter when sauteing the veggies. Adjust the amount of the various veggies as you see fit; lower the proportion of potatoes if you want, add in parsnips or use sweet potato chunks instead of fingerling slices. It's what you have on hand cooking at it's root. Sauteing the veggies helps with the final taste and texture. The free form look indicates good rustic cooking but you certainly can make these more refined looking by using a top crust with cut outs or add ons.
Simple Turkey (or Chicken) Gravy (This recipe can be halved)
Drippings from the roasting pan plus milk to equal 3 cups
2 to 3 teaspoons chicken stock paste
1/3 cup flour mixed with an additional 1/2 cup milk
1/2 cup heavy cream
Heat drippings and milk over medium heat until simmering. Add stock paste and mix thoroughly. Whisk in the flour and milk mixture. Reduce heat and cook until thicken, stirring often. Taste to adjust seasoning and add more chicken stock paste or salt if needed. Finish with the heavy cream. Heat through and serve. (Recipe can be made without drippings by increasing stock paste and adding at least 1 tablespoon butter.)
This is always a hit for dinner at my house. It is a stick to your ribs, comfort food that feels as good as it tastes somehow. Home cooking is really about satisfaction on many levels and dishes like pot pie get you there.
Tuesday, November 20, 2012
Sundried Tomato Vinaigrette
This thick salad dressing works just as well as a marinade. I rubbed it on a flank steak, let it sit for 1/2 hour before cooking and then served more as a sauce for the steak. It would also work with chicken or as a condiment for a beautiful panini.
Sundried Tomato Vinaigrette
1/4 cup oil packed sundried tomatoes, at room temperature
1 tablespoon pinenuts
1 small green onion
2 tablespoons balsamic vinegar
1/4 teaspoon black pepper
1/2 teaspoon kosher salt
1/4 cup extra virgin olive oil
Place all ingredients in a blender container. Blend until thoroughly combined and smooth. Serve over mixed greens and veggies.
Hints: Add extra oil and vinegar if the dressing is too thick for your taste. Use the best olive oil you have for this recipe. A clove of garlic would be a good addition to the recipe.
I like to have things like this in my fridge. Versatility is key when you want to create a delicious meal with what you have on hand. Utilizing flavors that are appealing to you in an unusual way or with different complementing flavors is an easy way to experiment. A new masterpiece may be moments away!
Sundried Tomato Vinaigrette
1/4 cup oil packed sundried tomatoes, at room temperature
1 tablespoon pinenuts
1 small green onion
2 tablespoons balsamic vinegar
1/4 teaspoon black pepper
1/2 teaspoon kosher salt
1/4 cup extra virgin olive oil
Place all ingredients in a blender container. Blend until thoroughly combined and smooth. Serve over mixed greens and veggies.
Hints: Add extra oil and vinegar if the dressing is too thick for your taste. Use the best olive oil you have for this recipe. A clove of garlic would be a good addition to the recipe.
I like to have things like this in my fridge. Versatility is key when you want to create a delicious meal with what you have on hand. Utilizing flavors that are appealing to you in an unusual way or with different complementing flavors is an easy way to experiment. A new masterpiece may be moments away!
Thursday, November 15, 2012
Sundried Tomato and Almond Pesto
Red is the new Green? This recipe was inspired by my recent trip to Austria. This is a red pesto that packs a WOW flavor punch. Toss with pasta or spread on a sandwich or use as a pizza base, if fact anyway that you would use a basil pesto, this tomato almond pesto will work. I think combining a bit of green and some of this red pesto could be remarkably on target this Holiday season!
Sundried Tomato and Almond Pesto
1/2 cup blanched almonds (see hints for easily blanching your own)
4 ounces sundried tomatoes and the oil they are packed in (1/2 an 8 ounce jar)
1 clove garlic
1/4 cup Romano cheese, grated
3/4 cup cherry, grape or pear tomatoes
3/4 teaspoon salt
Extra virgin olive oil as needed for proper consistency
Place almonds in a food processor bowl and pulse 7 or 8 times. Add remaining ingredients in order listed while blades are running and process until smooth. You may need to scrap down sides of bowl occasionally. Add additional olive oil as needed for proper consistency. Serve at room temperature. Refrigerate leftover pesto.
Hints: Blanch almonds by bringing 2 cups water to a boil. Pour 1/2 cup whole almonds into the water and continue to boil for 1 minute. Drain almonds in a colander and rinse with cold water. Place on a paper towel and slip skins off of each nut. Dry off on paper toweling and use according to recipe.
![]() | ||
| Grilled fresh mozz with Sundried Tomato Pesto |
1/2 cup blanched almonds (see hints for easily blanching your own)
4 ounces sundried tomatoes and the oil they are packed in (1/2 an 8 ounce jar)
1 clove garlic
1/4 cup Romano cheese, grated
3/4 cup cherry, grape or pear tomatoes
3/4 teaspoon salt
Extra virgin olive oil as needed for proper consistency
Place almonds in a food processor bowl and pulse 7 or 8 times. Add remaining ingredients in order listed while blades are running and process until smooth. You may need to scrap down sides of bowl occasionally. Add additional olive oil as needed for proper consistency. Serve at room temperature. Refrigerate leftover pesto.
![]() | |
| Rotini with Sundried Tomato Pesto |
![]() |
| The skin comes off in one piece as the nut "pops" out |
![]() | |
| Tightly covered, the pesto will stay fresh at least a week in the fridge. |
The photo above is of the pesto made with golden pear tomatoes and is more orange than pesto made with red grape or cherry tomatoes. Color adds a dimension that contributes to how pleasing the food will be. Taste and aroma and texture are all important and sometimes a cook will ignore color and/or presentation. Lost opportunity to enhance the experience.
Wednesday, October 17, 2012
Chciken Salad Spring Rolls
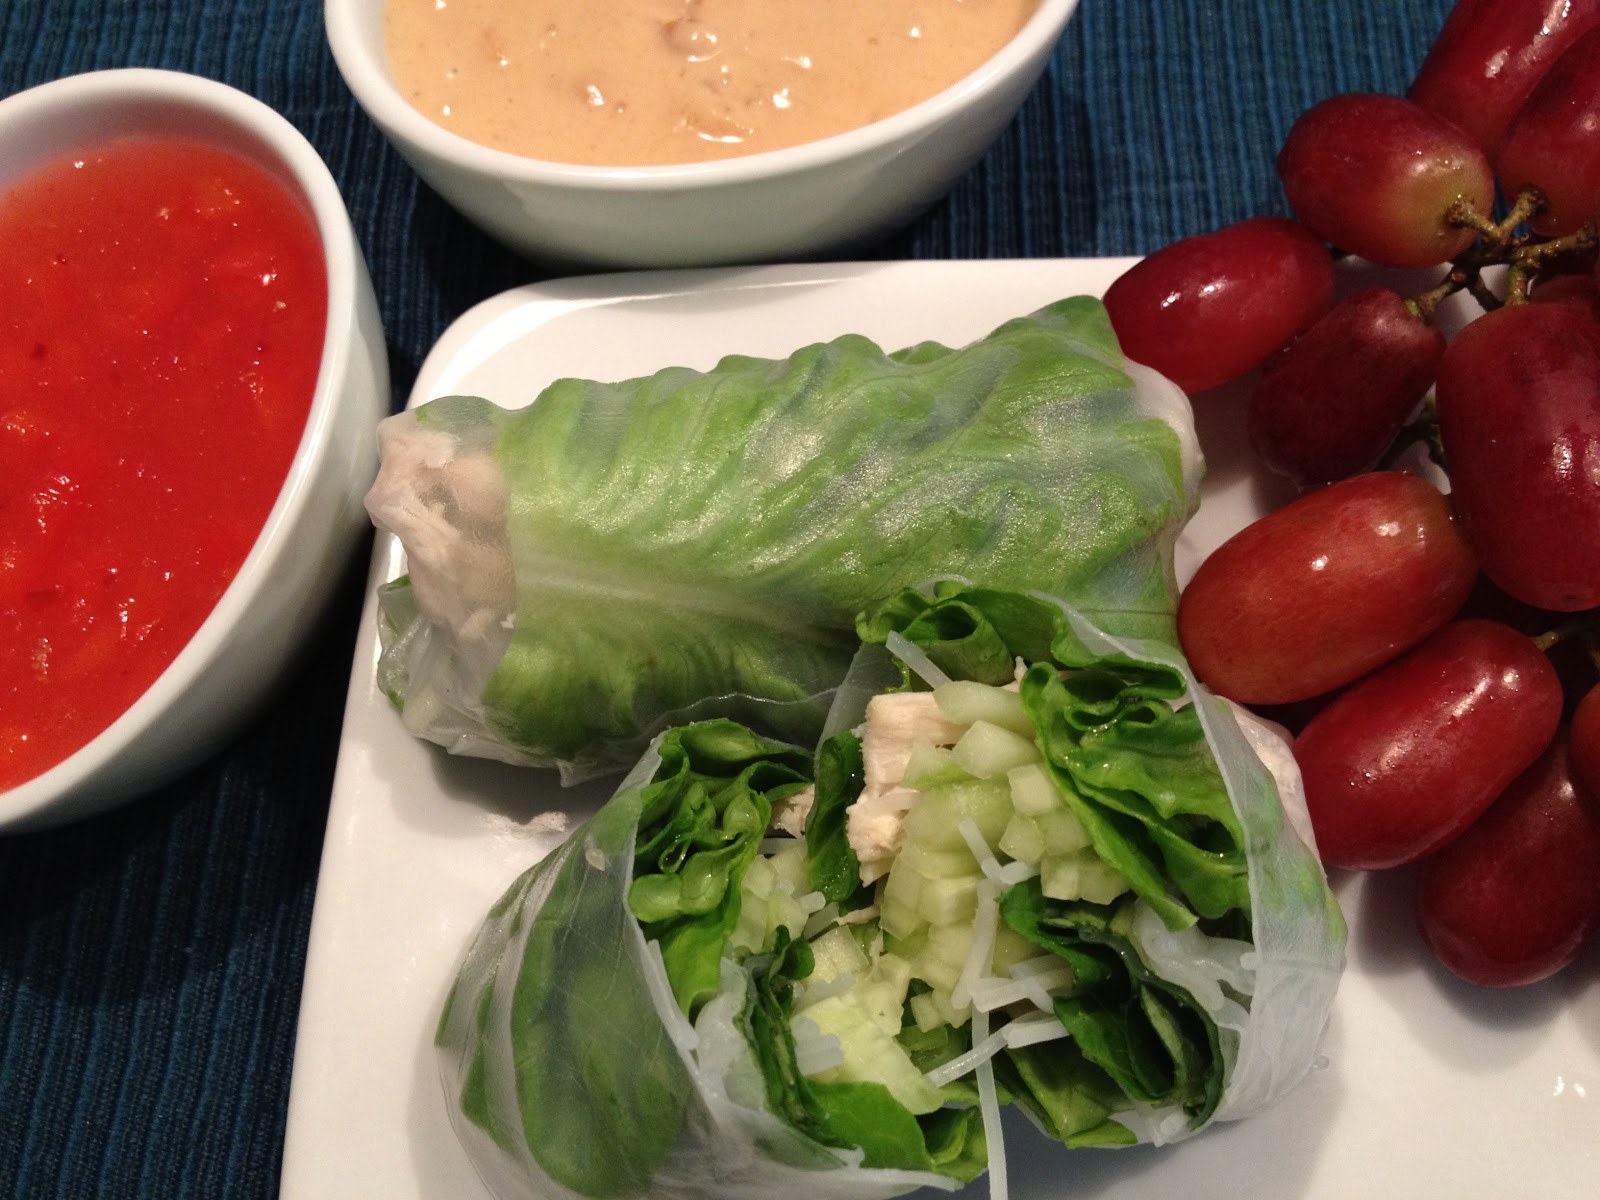
Wrapping it up: I know summer is over but a salad is always great. Nearly any occasion or any time of year is right for salad. These Chicken Salad Spring Rolls with dipping sauces are fabulous in the spring and summer but I really enjoy them in the fall and winter as well. They are fresh, light tasting and work great as a make ahead meal, snack or appetizer. The wrappers and the rice noodles will keep in your pantry for quite a while, so these can be made anytime you can get some fresh veggies and basil.
Chicken Salad Spring Rolls
3 cups water
1 large boneless, skinless chicken breast half
1/2 teaspoon salt
1/4 teaspoon black pepper
8 rice wrappers
1/4 package thin rice noodles
1 head butter or Boston lettuce
16 fresh basil leaves, approximately
3 green onions
1 medium cucumber
In a 9 or 10 inch skillet, heat water, chicken, salt and pepper to a boil. Cover and cook for 15 minutes or until chicken is cooked through. Remove chicken and set aside to cool. Place rice noodles in a glass dish and pour about half of the hot chicken water over them. Allow to sit while you prep the rest of the ingredients. Leave the remaining water in the skillet. Wash the lettuce and separate the leaves, discarding any hard stalk parts and keeping the soft, delicate parts. Pat dry with paper towels. Wash basil leaves and dry these as well. Clean green onions and slice them into thin rounds. Peel and seed the cucumber, then julienne it. Shred chicken with two forks. Assemble wraps by first dipping a single rice wrapper in the reserved water in the skillet. Soak it for about 15 to 20 seconds and then remove to a smooth work surface. Place a lettuce leaf (or two if they are small) on the wrapper, greenest side down. Top the lettuce with a tablespoon or so of chicken, 1/8 of the softened rice noodles, some of the cucumber and green onions. Finally use a couple of basil leaves on the very top. Pull the lettuce sides up to meet the basil and then warp the whole thing in the rice paper wrapper like a burrito--side in , bottom up, other side in then roll fairly tightly to the top edge. Place on a plate. Repeat with the other 7 wrappers. Chill for at least one hour and serve with Sweet Chili and Peanut dipping sauces.
Easy Peanut Dipping Sauce
2 tablespoons peanut butter
4 tablespoons water
2 teaspoons rice vinegar
1/8 teaspoon cayene pepper
Mix all ingredients together until thoroughly combined. Serve at room temperature.
Hot Chili Dipping Sauce
2/3 cup water
2 tablespoons rice vinegar
1 teaspoon cornstarch
1 tablespoon sugar
1/4 teaspoon freshly grated ginger root
1/8 teaspoon red pepper flakes
2 tablespoons minced red bell pepper
1/8 teaspoon salt
Place water and vinegar in a sauce pan over medium high heat. Stir cornstarch into sugar and add to pan. Add remaining ingredients and bring to a boil, stirring frequently. Cook and stir for 3 minutes and remove from heat. Serve warm or at room temperature.
Hints: These can be vegetarian by omitting the chicken and replacing it with more rice noodles or other veggies. Another good alternative is using cooked shrimp. The wrappers and the rice noodles are both available at Smiths Marketplace but I haven't found them at other grocery stores. Of course, they are available at Asian Markets. I use these same rice noodles for Oriental Chicken Salad but flash fry them in peanut oil for that recipe. They are also great under stir fries. The rice wrappers are not too difficult to work with if you take them out of the water before they are too soft. They continue to soften up as you are filling them and as they chill. Try to work quickly before they get too soft and begin tearing; that is why you work with only one at a time and you should have all your other ingredients ready to go before you get the wrappers wet. It may take you one or two rolls to perfect your wrapping skills. It will still taste great even if they look less than perfect. Photos of how to wrap Stuffed Grape Leaves use the same technique and may be helpful. Add more water to the Peanut Sauce if needed. And up to 1/4 teaspoon red pepper flakes in the Sweet Chili Sauce if you want it very spicy.
I first had one of these type of fresh spring rolls in San Fransisco at The Slanted Door, a wonderful place located in The Ferry Building. I have since had them at several places and liked them so much I needed to be able to make them. It is great to learn how to make your favorite things because it gives you the opportunity to customize them to your liking and makes them available more often!
Chicken Salad Spring Rolls
3 cups water
1 large boneless, skinless chicken breast half
1/2 teaspoon salt
1/4 teaspoon black pepper
8 rice wrappers
1/4 package thin rice noodles
1 head butter or Boston lettuce
16 fresh basil leaves, approximately
3 green onions
1 medium cucumber
In a 9 or 10 inch skillet, heat water, chicken, salt and pepper to a boil. Cover and cook for 15 minutes or until chicken is cooked through. Remove chicken and set aside to cool. Place rice noodles in a glass dish and pour about half of the hot chicken water over them. Allow to sit while you prep the rest of the ingredients. Leave the remaining water in the skillet. Wash the lettuce and separate the leaves, discarding any hard stalk parts and keeping the soft, delicate parts. Pat dry with paper towels. Wash basil leaves and dry these as well. Clean green onions and slice them into thin rounds. Peel and seed the cucumber, then julienne it. Shred chicken with two forks. Assemble wraps by first dipping a single rice wrapper in the reserved water in the skillet. Soak it for about 15 to 20 seconds and then remove to a smooth work surface. Place a lettuce leaf (or two if they are small) on the wrapper, greenest side down. Top the lettuce with a tablespoon or so of chicken, 1/8 of the softened rice noodles, some of the cucumber and green onions. Finally use a couple of basil leaves on the very top. Pull the lettuce sides up to meet the basil and then warp the whole thing in the rice paper wrapper like a burrito--side in , bottom up, other side in then roll fairly tightly to the top edge. Place on a plate. Repeat with the other 7 wrappers. Chill for at least one hour and serve with Sweet Chili and Peanut dipping sauces.
Easy Peanut Dipping Sauce
2 tablespoons peanut butter
4 tablespoons water
2 teaspoons rice vinegar
1/8 teaspoon cayene pepper
Mix all ingredients together until thoroughly combined. Serve at room temperature.
Hot Chili Dipping Sauce
2/3 cup water
2 tablespoons rice vinegar
1 teaspoon cornstarch
1 tablespoon sugar
1/4 teaspoon freshly grated ginger root
1/8 teaspoon red pepper flakes
2 tablespoons minced red bell pepper
1/8 teaspoon salt
Place water and vinegar in a sauce pan over medium high heat. Stir cornstarch into sugar and add to pan. Add remaining ingredients and bring to a boil, stirring frequently. Cook and stir for 3 minutes and remove from heat. Serve warm or at room temperature.
Hints: These can be vegetarian by omitting the chicken and replacing it with more rice noodles or other veggies. Another good alternative is using cooked shrimp. The wrappers and the rice noodles are both available at Smiths Marketplace but I haven't found them at other grocery stores. Of course, they are available at Asian Markets. I use these same rice noodles for Oriental Chicken Salad but flash fry them in peanut oil for that recipe. They are also great under stir fries. The rice wrappers are not too difficult to work with if you take them out of the water before they are too soft. They continue to soften up as you are filling them and as they chill. Try to work quickly before they get too soft and begin tearing; that is why you work with only one at a time and you should have all your other ingredients ready to go before you get the wrappers wet. It may take you one or two rolls to perfect your wrapping skills. It will still taste great even if they look less than perfect. Photos of how to wrap Stuffed Grape Leaves use the same technique and may be helpful. Add more water to the Peanut Sauce if needed. And up to 1/4 teaspoon red pepper flakes in the Sweet Chili Sauce if you want it very spicy.
I first had one of these type of fresh spring rolls in San Fransisco at The Slanted Door, a wonderful place located in The Ferry Building. I have since had them at several places and liked them so much I needed to be able to make them. It is great to learn how to make your favorite things because it gives you the opportunity to customize them to your liking and makes them available more often!
![]() |
| Rice wrappers are like thick paper until softened. |
| Soak in hot water or flash fry. |
Thursday, October 11, 2012
Gingered Sweet Potato Fries and Pomegranate Sauce
It is hard to improve ketchup and fries. So I'm not calling this an improvement but a revision. Sweet potatoes are so yummy and so healthy and this new "ketchup" (pomegranate sauce) is supremely versatile. I have some more awesome suggestions to use it in the Hints section.
Gingered Sweet Potato Fries with Pomegranate Sauce
1 large sweet potato
2 tablespoons vegetable oil
1 teaspoon powdered ginger
1 teaspoon kosher salt
1/2 teaspoon nutmeg
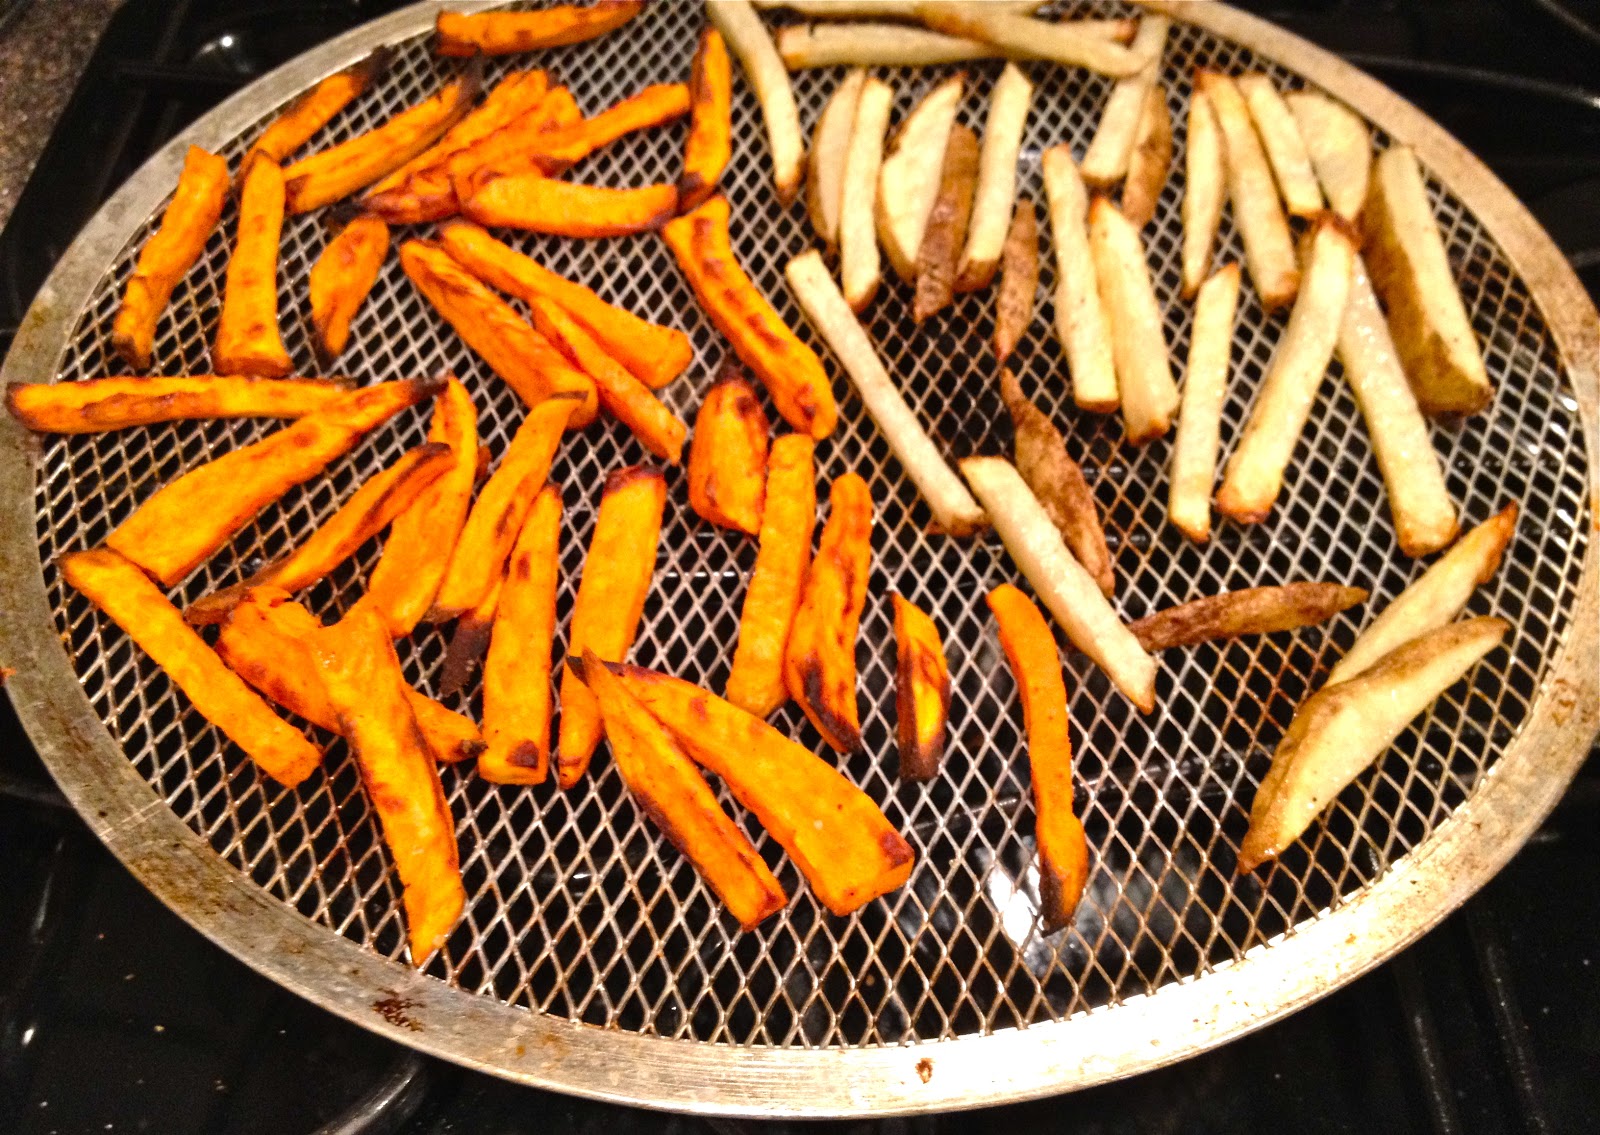
Heat oven to 450 degrees. Peel potato and cut into 1/4 inch thick fries and set aside. In a large mixing bowl combine oil, ginger, salt and nutmeg. Toss potato strips in oil mixture to coat evenly. Place fries on a baking screen. Cook at 450 degrees for 18 to 20 minutes or until crispy and beginning to brown. Serve immediately with pomegranate "ketchup".
Pomegranate Sauce
4 cups pomegranate arils
1 cup honey
2 tablespoons lime juice
1/8 teaspoon kosher salt
Combine all ingredients in a sauce pan and bring to a boil over medium high heat. Reduce heat to medium low and keep at a simmer for 30 minutes, stirring often. Puree using an immersion blender. Push through a fine mesh strainer to remove seeds. Serve warm or chilled.
Hints: Getting the fries done at the same time without burning is made posible if they are cut close to the same size. A baking screen is the best possible way to get the fries crispy without deep frying them. Screens are fairly inexpensive, available at cooking stores and can be stored in minimum space. Fresh grated ginger root tends to burn in this recipe so opt for the powdered ginger here. The sauce is great by it self but you can add 1/4 teaspoon fresh ginger root to 2 tablespoons of sauce for a really nice kick. The sauce is also great to garnish baba ganoush instead of pomegranate molasses. It makes a great base for saucing pork medallions or sauteed chicken: deglaze the sautee pan with a bit of orange juice (or grapefruit juice) and finish the sauce with some butter like in this recipe, adding about 1/4 cup of the pomegranate sauce with the butter. I could see this sauce replacing cranberry sauce, being used as a ice cream topping, as a syrup base in beverages or in frosting. It would be great on a buffalo blue cheese burger! I had it on my multi-grain pancakes this morning. Endless options here folks...make some soon and please let me know how you used it.
Pomegranate season is here! I love it! The pomegranates, the leaves changing, sweater weather! Thanksgiving is coming! What's not to love?!
1 large sweet potato
2 tablespoons vegetable oil
1 teaspoon powdered ginger
1 teaspoon kosher salt
1/2 teaspoon nutmeg
Heat oven to 450 degrees. Peel potato and cut into 1/4 inch thick fries and set aside. In a large mixing bowl combine oil, ginger, salt and nutmeg. Toss potato strips in oil mixture to coat evenly. Place fries on a baking screen. Cook at 450 degrees for 18 to 20 minutes or until crispy and beginning to brown. Serve immediately with pomegranate "ketchup".
Pomegranate Sauce
4 cups pomegranate arils
1 cup honey
2 tablespoons lime juice
1/8 teaspoon kosher salt
Combine all ingredients in a sauce pan and bring to a boil over medium high heat. Reduce heat to medium low and keep at a simmer for 30 minutes, stirring often. Puree using an immersion blender. Push through a fine mesh strainer to remove seeds. Serve warm or chilled.
| Two kinds of fries on a baking screen. |
Hints: Getting the fries done at the same time without burning is made posible if they are cut close to the same size. A baking screen is the best possible way to get the fries crispy without deep frying them. Screens are fairly inexpensive, available at cooking stores and can be stored in minimum space. Fresh grated ginger root tends to burn in this recipe so opt for the powdered ginger here. The sauce is great by it self but you can add 1/4 teaspoon fresh ginger root to 2 tablespoons of sauce for a really nice kick. The sauce is also great to garnish baba ganoush instead of pomegranate molasses. It makes a great base for saucing pork medallions or sauteed chicken: deglaze the sautee pan with a bit of orange juice (or grapefruit juice) and finish the sauce with some butter like in this recipe, adding about 1/4 cup of the pomegranate sauce with the butter. I could see this sauce replacing cranberry sauce, being used as a ice cream topping, as a syrup base in beverages or in frosting. It would be great on a buffalo blue cheese burger! I had it on my multi-grain pancakes this morning. Endless options here folks...make some soon and please let me know how you used it.
![]() |
| An easy way to get the arils is under water. Score the skin in several spots and pull apart under water. |
Pomegranate season is here! I love it! The pomegranates, the leaves changing, sweater weather! Thanksgiving is coming! What's not to love?!
Thursday, September 20, 2012
Salsa, Two Ways
Old standbys are old standbys because they are good, timeless and/or easy. Here are two basic Salsa recipes to go with your chips and guac. One is pantry friendly: you can pull out the ingredients and whip up a batch any time. And one is fresh: you need to have thought ahead to buy the cilantro, peppers, etc. Both have their place in life. In the Hints section, there are some ideas to elevate the experience.
Basic Pantry Salsa
1 can diced tomatoes
1 small onion (you have one in your pantry, don't you?)
1 clove garlic, smashed (or use garlic salt)
1 small can mild green chilies, diced
1 teaspoon coriander
2 tablespoons diced jalapeno peppers, bottled
1 tablespoon lime juice (or lemon)
1 teaspoon salt
Mix all ingredients in a blender container and whirl for 20 to 30 seconds.
Basic Fresh Salsa
1 small onion
1 red bell pepper
1/2 fresh jalapeno pepper (for mild to medium, add more for hot)
1 clove garlic
2 large or 4 small tomatoes
1 tablespoon lemon juice (or lime)
10 sprigs fresh cilantro
1 to 2 teaspoons kosher salt
Peel and quarter onion. Seed and quarter bell pepper. Seed and quarter jalapeno pepper. Smash and peel garlic. Place these in a food processor bowl and pulse until uniformly chopped, scraping sides of bowl as needed. Add tomatoes, juice, cilantro and salt. Pulse 4 or 5 times just until the tomato and cilantro are chopped.

Hints: Salt really makes the finish. Add more if needed to either recipe. Using dehydrated onion in the Pantry type works alright but you need to let the onions rehydrate in the tomato juice a few minutes before blending. The fresh version can be made in a blender but a food processor works a bit better for even chopping. You can use any type of hot pepper in either recipe or none at all (but that would just be sad). Adjust the heat according to your tolerance for fire mouth. A great addition for pantry salsa is 1/4 cup finely shredded carrot. Heat this salsa in the microwave and top with grated cheddar. Adding toasted corn kernels and/or black beans works well in the Fresh version. Substituting mango or peach for half the fresh tomatoes is fabulous. Charring the peppers before using them adds another dimension to the flavor profile. Adding chili powder, cumin or other spices is totally up to your tastes. Fresh oregano, parsley or rosemary are nice herbs to consider adding.
I have had a love for salsa for most of my life. In high school, Sharalyn and I had contests to see who could hold up under some very hot, hot salsa. We would eat the salsa served at the local Mexican cafe as soup. Bill asked me one time why I like food that hurts and I couldn't explain it to him but I really do. Wasabi and hot mustard? Love 'em! Horseradish and habanero? I'll have some!
Basic Pantry Salsa
1 can diced tomatoes
1 small onion (you have one in your pantry, don't you?)
1 clove garlic, smashed (or use garlic salt)
1 small can mild green chilies, diced
1 teaspoon coriander
2 tablespoons diced jalapeno peppers, bottled
1 tablespoon lime juice (or lemon)
1 teaspoon salt
Mix all ingredients in a blender container and whirl for 20 to 30 seconds.
Basic Fresh Salsa
1 small onion
1 red bell pepper
1/2 fresh jalapeno pepper (for mild to medium, add more for hot)
1 clove garlic
2 large or 4 small tomatoes
1 tablespoon lemon juice (or lime)
10 sprigs fresh cilantro
1 to 2 teaspoons kosher salt
Peel and quarter onion. Seed and quarter bell pepper. Seed and quarter jalapeno pepper. Smash and peel garlic. Place these in a food processor bowl and pulse until uniformly chopped, scraping sides of bowl as needed. Add tomatoes, juice, cilantro and salt. Pulse 4 or 5 times just until the tomato and cilantro are chopped.

Hints: Salt really makes the finish. Add more if needed to either recipe. Using dehydrated onion in the Pantry type works alright but you need to let the onions rehydrate in the tomato juice a few minutes before blending. The fresh version can be made in a blender but a food processor works a bit better for even chopping. You can use any type of hot pepper in either recipe or none at all (but that would just be sad). Adjust the heat according to your tolerance for fire mouth. A great addition for pantry salsa is 1/4 cup finely shredded carrot. Heat this salsa in the microwave and top with grated cheddar. Adding toasted corn kernels and/or black beans works well in the Fresh version. Substituting mango or peach for half the fresh tomatoes is fabulous. Charring the peppers before using them adds another dimension to the flavor profile. Adding chili powder, cumin or other spices is totally up to your tastes. Fresh oregano, parsley or rosemary are nice herbs to consider adding.
I have had a love for salsa for most of my life. In high school, Sharalyn and I had contests to see who could hold up under some very hot, hot salsa. We would eat the salsa served at the local Mexican cafe as soup. Bill asked me one time why I like food that hurts and I couldn't explain it to him but I really do. Wasabi and hot mustard? Love 'em! Horseradish and habanero? I'll have some!
Subscribe to:
Posts (Atom)